Showing posts with label 2 Design. Show all posts

Wednesday, 18 January 2012

Rhythm and Pattern (2.5)

Requirement
At least 2 photographs, one showing pattern, the other rhythm

Purpose

To show how to create interest when photographing design elements massed together.

Technical learning

  • Repetition has strong appeal in photography – a visual beat as opposed to a musical one
  • Repetition comes in two forms:  pattern and rhythm
  • Pattern is static, rhythm creates 'movement'
  • Movement  is the path the viewer’s eye takes through an image, often to a focal point: it can be directed along lines, edges, shapes and colour
  • Key to drawing out repetition is (a) distance from subject and (b) choice of focal length

Pattern
  • Pattern is static repetition: i.e. it does not encourage the eye to move in a particular way
  • Pattern is usually used as a secondary element: images which use pattern as their main element tend to be monotonous
  • You can encourage a sense of continuation (beyond the frame) by excluding any space between the pattern and the edge of the image
  •  As the elements (of a pattern) become more numerous, the viewer tends to see them less as a 'pattern' and more as ‘texture’
Rhythm
  • Rhythm is dynamic repetition: i.e. it prompts the eye to move in a certain way around the image and/or to settle somewhere important
  • Rhythm can be classified into (a) attention rhythm (elements regularly alternating with each other) (b) progressive rhythm (change in shape of elements at regular intervals) or (c) rhythm sensation (change in elements’ colour, size and shape at regular intervals) depending on the way and rate at which the image's elements repeat themselevs.
  • More subtly, rhythm also extends to different elements that repeat, yet imitate each other in the photo: e.g. curves on branches might be echoed in the shapes of distant mountains. 
  • Whilst the frame may limit any rhythm to a fragment, composition should encourage the viewer to imagine that movement continues beyond the frame
  • When the rhythm is predictable it may need a contrasting element to break the repetition and so add interest


Project and review

Shoot one example of a pattern, another of showing rhythm. Pattern - Fill the frame and eliminate boundaries that break the pattern so that viewer can imagine pattern continues beyond the frame. Rhythm - Capture a sequence so that the eye will follow a direction and feel an optical beat. 


Sherlock Holmes tiles at Baker Street Station, London


Pattern: The motifs on the tiles
create a regular but static image.
The impression of continuation occurs
 by cropping across them.


Cloister in Paternoster Square, London


Rhythm: the repeating columns and
orange flanges move the eye along the
cloister, reinforced by the pedestrian
walking into the frame
 

Monday, 16 January 2012

Shapes (2.4)

Requirement

6 photographs

Purpose

To show how to use basic shapes – triangle, rectangle and circle – to bring order and clarity to an image,  especially in still life or in a potentially untidy setting

Technical learning

  • Shape can be (a) the outline of an object (like a silhouette) or (b) an enclosure which implies shape (like arms forming a triangle)
  •  The more regular a shape, the stronger its effect in an image
  •  Light plays a significant role in strengthening shape
  •  Basic shapes are of three types: triangle, rectangle, circle
  • Other shapes are combinations of these basic types
Creating shape in image is often a case of simplifying composition to remove distracting elements, by: 
  • Altering viewpoint
  • Moving closer to the subject
  • Using telephoto
  • Rearrange objects in view
  • Change lighting (or waiting for it to change)

The role of shape in composition is to:
  • Organize elements of an image
  • Enclose so they help elements cohere
  • Add clarity in an untidy world

Triangles 
  • Occur most frequently
  • Most valuable shape
  • Have the lowest number of sides and corners of basic shapes
  • Comprise ‘active’ diagonals
  • Often created by linear perspective (and so add depth): i.e. lines converge to a vanishing point
  • Often appear to be ‘pointing’: if viewpoint is low, linear perspective gives an upward pointing triangle; if viewpoint is high, triangle will point downwards
  • Examples: group of 3 people, corner of a building photographed from a low angle, hill set against 2 edges of image frame
  • Important to distinguish between ‘real’ (i.e. clearly visible edges) and ‘implied’ triangles (i.e. any 3 prominent points will imply a triangle)

Rectangles
  • Rectangles have expressive associations of being formal, static, precise, enclosing, artificial
  • Usually man-made forms, rarely found in nature, and so tend to be artificial
  • More complex than triangles (4 sides, 4 corners), but less dynamic - mimic the shape of the frame
  • Horizontal and vertical lines, which when intersecting create rectangles, are the simplest way of dividing the frame
  • However, they demand precision since they must be parallel with the relevant 2 frame edges: they need to be photographed face on

Circles
  • Rarest of the basic shapes to find
  • Usually only arises with circular objects
  • Tightest, most compact and enclosing of shapes

Project and review

Produce 3 images each of real and implied triangles

(a) Real Triangles 

Mercedes Benz World, Brooklands 


Triangular subject: the corner of the showroom
has an acute angle. The strength of the triangle
gets prominence by shooting it head on. The 3 rows of
cars on display adds to this effect.


The Shard, London Bridge under constuction


Triangle by perspective, converging
to the top of the frame:
Skyscrapers are an
obvious choice. The triangular shape of the building
adds to the impact. However, the 2 cranes weaken
the effect


View from a hotel room 


Inverted triangle by perspective,
converging towards the bottom
of the frame: 
the downward view from the
12th floor of the hotel creates a strong perspective
and the impression of a triangle. This helps fix
the eye in the frame as well as proide a
leading line towards the street below


(b) Implied Triangles 

Grapefruit in a supermarket

Implied triangle with apex
at the bottom: 
The grower's label, suitably arranged
as a still life, draws out the triangular shape.
These act as strong points due to the colour contrast
(violet on yellow) 

3 workmen on a building site

Implied triangle with the apex at the top:
The gaze and body shape of the workmen
prompts the triangle of interest for
the eye

Lunch conversation near Borough Market

3 people in a group: the direction of their heads
create an implied triangle. The eye moves round
the triangle, pulling attention towards that space 


Monday, 9 January 2012

Using lines (2.3)


Requirement

2 photographs

Purpose

To show how to use implied lines to energise an image

Technical learning

  • The eye follows a line. 
  • It also tries to create a line(s) from appropriate suggestions: the brain and the eye work together to resolve incomplete forms
  • 4 most common clues that create implied lines are – (a) a row of points (or objects) (b) the extension of a line(s) that points in a certain direction (the eye keeps on traveling) (c) the extension of visible movement (a car moving, a person walking) (d) the direction of the human gaze (eye line)
  • Lines can animate an image, most effectively by using diagonals and curves and particularly if the movement is outward, i.e. it leads the eye towards the frame. The eye the moves back into the frame to see more. This to-and-fro effect creates tension and activity

Project and review

Look at 2 pictures in manual: show the implied lines in a small sketch. Find any 3 photos of your own and perform the same analysis.  Take 2 photographs that use the following implied lines to lead the eye: (a) an eye line, (b) extension of a line, or lines that point.


Photographer with model


The gaze of the photogarpher at his model sets
up an implied line. It would have been stronger
if she was looking directly at him and her eyes
were visible in the image


Close up of war memorial, Vivary Park, Taunton


The S of the names creates 
an implied line that reaches beyond 
the top of the frame


Friday, 6 January 2012

Lines (2.2b) - curves


Requirement

4 photographs

Purpose

To show how curves create movement and direction within an image

Technical learning

  • Curves operate like diagonals in creating movement
  • Useful in composition because they lead the eye strongly
  • Often using a low viewpoint gives an acute angle of view along the lines and strengthens their curvature


Project and review

Take 4 separate images of curves to show movement and direction.


View from lay-by on the A39 near Bawdrip, Somerset 


Showing the curve of the bend in
the road around the field
Display of spices, Borough Market, London


Each sample serves as a point
on an arc like arrangement
Boats moored off the River Wey, Surrey


The boardwalk and line of boats
both create curves that
contrast with each other


'Boris bikes' on their stands


Looking through the rear wheels of
the bikes shows a series of curves


Wednesday, 4 January 2012

Lines (2.2b) - diagonals


Requirement

 4 photographs


Purpose

To show how:
  • Diagonals are often created from linear perspective (linear perspective adds depth to an image)
  • Diagonals add movement to an image

Technical learning

  • Creating diagonals in photography depends largely on camera angle and perspective: diagonals are less common in real life than vertical or horizontal lines
  • Diagonals create a stronger sense of movement and direction than vertical and horizontal lines do: (a) they contrast more strongly with the edge of the frame and (b) they are associated with being physically unstable, even of falling
  •  Wide angle lenses used close to an edge or a surface creates strong diagonals (sense of perspective), whilst telephoto lenses used at an angle to parallel lines, edges, rows of objects, can give a powerful diagonal effect by compression and repetition
Examples
  • Straight edges (e.g. flat top of a building, top of a wall) become diagonal lines if you photograph along them towards the distance, due to perspective in 2D images
  • Vertical or horizontal lines in a close up shot become diagonal if you rotate your camera
  • Vertical or horizontal lines in long shots taken from a high point become diagonal if you move the camera sideways


Project and review

Take 4 photographs with strong diagonals.

Used cars at Brooklands, Weybridge


Row of objects shot with a telephoto lens
with frame cropped to 2:1 ratio
Statue of Sir Joshua Reynolds outside Royal Academy, London


Focus from a low viewpoint
on arm of statue creates
a diagonal line
Late evening strollers along South Bank, London


Setting sun throws diagonal shadows on
the paving stones of the embankment


Promenade at Sidmouth, Devon


Telephoto lens used at an acute angle to
the terraced buildings and railings creates
a diagonal subject


Tuesday, 3 January 2012

Lines (2.2a) - vertical and horizontal


Requirement 

8 photographs


Purpose
To show the impact of on an image of using strong vertical and horizontal lines

Technical learning

  • Lines are often the edges of objects: contrast makes them stand out
  • Lines in photographs are reinforced by reference to the edges of the frame
  • Lines have 2 qualities: one graphic, the other expressive
  • The graphic qualities - divides the frame, helps locate elements within the frame, gives a sense of direction (along the line)
  • Expressive impact - varies with type of line

Vertical lines
  • Expressive impact: provides moderate sense of movement, confronts viewer
  • Examples: walls, posts, trees, standing human figure, road seen from high viewpoint, a row of objects seen from a high viewpoint

Horizontal lines
  • Expressive impact: strong locating impact, natural base for objects to stand on, seen as static, stable, having weight
  • Examples: horizon line, man-made flat surfaces, long shadows (light at low side angle), row of objects at same distance from camera, mass of objects seen at a low angle

Lines also occur by implication: our imagination makes connects individual points.

Project and review

Look for specific examples of vertical and horizontal lines: discover how some design elements occur and how common or rare they are.  Shoot 4 different examples of horizontal lines and 4 of vertical ones. Make the line what the viewer sees first.


Horizontal


Leeks in supermarket display


Regular stacking of leeks create
powerful horizontal lines


Wooden roof


Shadow on edges of wooden strips on roof create
a series of strong horizontal lines


Steel and glass roof of Canary Wharf DLR Station


Steel supports for intricate
glass panels of roof produce sillhouettes
of thick, irregular horizontal lines
Ornamental egg and against Venetian Blinds

Daylight on the edges of the closed Venetian Blinds
creates a series of horizontal lines (as
well as shadow lines on the egg)


Vertical


TV masts in Dorset


Masts dominate naturally dominate landscape, so
eye level viewpoint is enough to make them 
appear prominent
Wooden Yogi Sculpture


Shot from a low angle with
a macro lens to emphasise
height of sculpture


Trunk of dying tree 


Grain of wood runs vertically,
empahsised by converting
image to black & white


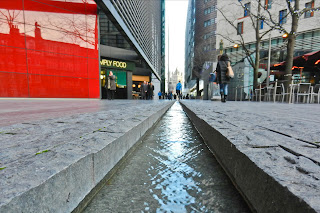
Water gully at One More London


Wide angle lens close to surface of gully
emphasises the lines. Also works as a triangle


Friday, 30 December 2011

Points (2.1c) - multiple points


Requirement
6 photographs

Purpose
To show how implied lines exist between multiple points, creating a shape or movement

Technical learning
  • A group of points implies either a network of lines or a shape
  • Grouping objects/ people in an active way is a key factor in producing a successful still life
Project and images
    Set up a still life composition on a simple (but not plain) background. Identify 6 to 10 identical, or at least similar, objects. Organise these objects into a shape. Fix the camera firmly in position and aim at the composition. Control the group by re-arrangement. Consider each move and its effect. Shoot 6 images. 

    Decided to look as much as possible for points forming shapes that occur without my intervention. This led to the first 5 images below. The 6th image is a still life arranged by me.


    Tree stumps in a wood


    Several triangles (e.g. front 4 stumps, 
    middle plus bottom 2, middle plus 2 in left half).
    Outside 5 stumps make a a pentagon. 
    4 in top half form a square


    London Eye in the mist


    Line of pods create a parbola


    Anchors on a wall, London Embankment


    Outside 4 anchors create a square
    4 sets of triangles around anchor in middle 
    (top and bottom halves, left and right halves)
    Water bowl with flowers


    Flowers create a pentagon


    Door at entrance to Paternoster Square, London


    Rivets in wood form a rectangle


    Stone Backgammon Board


    Counters on board create an arrow
    inside the rows of triangles on either side


    Wednesday, 28 December 2011

    Points (2.1b) - relationship between points

    Requirement
    3 photographs


    Purpose
    To show how 2 points create a relationship between each other as well as introduce energy into the image


    Technical learning

    • As with a single point in a frame, a relationship exists bewteen the point(s) and the frame. However, a relationship is also exists between the 2 points themselves.
    • The eye is drawn to one and then the other
    • This sets up (a) an implied line and direction within the image as well as (b) a vaguely defined space around them
    • One of the points usually attracts more attention than the other, where it is (a) bigger, (b) nearer to the foreground or (c) closer to the centre
    • Sometimes both points attract equal attention, i.e. where they are the same size, symmetrical to the centre, the same distance from the camera
    • Unresolved tension can energise an image, although taken to extremes this can damage the composition.
    Project and images
    Identify a situaton with 2 points. 
    • Produce an image where the points are equal in the frame
    • Produce another image where one dominates by size
    • Produce a third where one dominates by colour
    In the last two photos, identify the point which is stronger and why.


    Building site in West End, London


    2 points of the same size
    Close-up of a hoarding advertsing the construction of an office block, Holborn, London


    The bottom point dominates as it occupies
    more of the frame 
    2 climbers on a rock face


    The lower climber attracts the eye slightly more
    than his partner because of the
    warmer colour of his clothing, red shirt vs
    blue one. If, for example,
    his back pack would have been yellow, he would
    draw the eye even more strongly.

    Tuesday, 13 December 2011

    Points (2.1a) - positioning a point

    Requirement
    6 to 12 photographs


    Purpose
    To show how points create attention and movement


    Technical learning

    Points are a fundamental design element


    What is a point? 
    • A subject becomes a 'point' where it is small in the frame and contrasts with its background (e.g. a boat on a larger expanse of water)
    What role does it play? 
    • It draws attention to the subject - if it fails to do this (say, if the subject is too large relative to its background), the subject is not, or stops being, a point
    How do you position a point in the frame? 
    • 3 options: middle, off-centre or near the edge. 
    • However, your choice of location must add meaning or impact to the image
    • Balance, equilibrium between the elements, is also important 
    Project and images
    1. Note as many situations of images with points
    2. Review own past photographs and note obvious points
    3. Shoot 3 images showing examples of points: middle, off centre and close to the edge of the frame.
    Stable centred point, divides the frame symetrically
    and holds the eye fixed in the middle. Contrast to create
    the point comes from difference colour, sharpness and texture
    Slightly off centre, forces the eye to explore the edges
    of the frame before returning to the point.

    Point in upper right part of frame, encourages the eye to
    move to the framme edges, back to the subject and then to
    repeat this journey. Creates tension.


    • consider the relationship the point has in each frame, in terms of movement and division
    • movement arises from the relationship between the points and the sides of the frame
    • division arises from imaginary lines running through the  point across and down towards the edges of the frame.